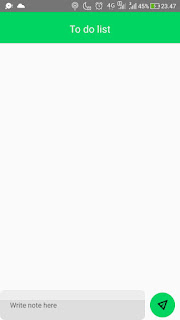
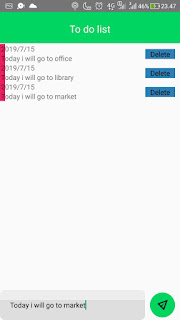
Dalam aplikasi To Do List memungkinkan menulis dan menghapus catatan.
Memulai react native
1. Buatlah sebuah direktori; misal: todolist
2. Buka terminal arahkan ke direktori yang telah dibuat, ketikkan npm install -g yarn
3. Setelah itu buat project baru : react-native init "todolist"
4. Tunggu proses hingga sukses.
Buka project yang sudah dibuat tadi, bisa dengan visual code. lalu buka file app.js ganti semua kode dengan dibawah ini.
App.js
 /**
  * Sample React Native App
  * https://github.com/facebook/react-native
  *
  * @format
  * @flow
  */
 import React from 'react';
 import Main from './app/component/main'
 export default class App extends React.Component {
  render() {
   return (
     <Main/>
   );
  }
 }
Didalam direktori component buat file main.js dan note.js
main.js
 /**
  * Sample React Native App
  * https://github.com/facebook/react-native
  *
  * @format
  * @flow
  */
 import React from 'react';
 import {StyleSheet, Text, View, TextInput, ScrollView, TouchableOpacity, Image} from 'react-native';
 import Note from './note';
 export default class Main extends React.Component {
  constructor(props){
   super(props);
    this.state={
     noteArray:[],
     noteText:'',
    }
   }
  render() {
   let notes = this.state.noteArray.map((val, key) => {
    return <Note key={key} keyval={key} val={val}
    deleteMethod={() => this.deleteNote(key)}/>
   });
   return (
    <View style={styles.container}>
    <View style={styles.header}>
    <Text style={styles.textHeader}>To do list</Text>
    </View>
    <ScrollView style={styles.ScrollContainer}>
 {notes}
    </ScrollView>
    <View style={styles.footer}>
     <TextInput
     onChangeText={(noteText) => this.setState({noteText})}
     style={styles.textInput}
     placeholder="Write note here"
     placeholderTextColor='#656464'/>
    </View>
    <TouchableOpacity style={styles.addButton} onPress={this.addNote.bind(this)}>
    <Image
       //We are showing the Image from online
       source={{
        uri:
         'https://img.icons8.com/material-outlined/24/000000/filled-sent.png',
       }}
       //You can also show the image from you project directory like below
       //source={require('./Images/facebook.png')}
       //Image Style
       style={styles.ImageIconStyle}
      />
    </TouchableOpacity>
    </View>
   );
  }
  addNote(){
   if(this.state.noteArray){
    var d = new Date();
    this.state.noteArray.push({
     'date' : d.getFullYear()+
     '/'+(d.getMonth()+ 1)+
     '/'+ d.getDate(),
     'note' : this.state.noteText
    });
    this.setState({noteArray: this.state.noteArray})
    this.setState({noteText: ''})
   }
  }
  deleteNote(key){
   this.state.noteArray.splice(key, 1);
   this.setState({noteArray: this.state.noteArray})
  }
 }
 const styles = StyleSheet.create({
  container: {
   flex: 1,
  },
  header:{
   backgroundColor: '#00D561',
   alignItems: 'center',
   justifyContent: 'center',
   borderBottomWidth: 2,
   borderBottomColor: '#ddd',
  },
  textHeader:{
   color: 'white',
   fontSize: 20,
   padding: 20,
   paddingBottom: 15,
  },
  ScrollContainer:{
   flex: 1,
   marginBottom: 100,
  },
  footer:{
    position: "absolute",
    bottom:0,
    left:0,
    right:0,
    zIndex: 90,
  },
  textInput:{
   alignSelf:'stretch',
   color:'#000',
   padding:20,
   backgroundColor:'#DEDEDE',
   borderRadius:15,
   alignItems:'center',
   borderTopWidth:20,
   height:1,
   marginLeft:20,
   marginBottom:10,
   width:270,
   borderTopColor:'#ededed',
  },
  addButton:{
   position:'absolute',
   zIndex:10,
   right:10,
   bottom:10,
   backgroundColor:'#00D561',
   width:50,
   height:50,
   borderRadius:50,
   alignItems: 'center',
   justifyContent:'center',
  },
  addButtonText:{
   color:'white',
   fontSize:34,
  },
  ImageIconStyle: {
   padding: 10,
   margin: 5,
   height: 25,
   width: 25,
   resizeMode: 'stretch',
  },
 });
note.js
 /**
  * Sample React Native App
  * https://github.com/facebook/react-native
  *
  * @format
  * @flow
  */
 import React from 'react';
 import {StyleSheet, Text, View, TouchableOpacity} from 'react-native';
 export default class Note extends React.Component {
  render() {
   return (
    <View key={this.props.keyval} styles={styles.note}>
      <Text style={styles.noteText}>{this.props.val.date}</Text>
      <Text style={styles.noteText}>{this.props.val.note}</Text>
      <TouchableOpacity onPress={this.props.deleteMethod} style={styles.noteDelete}>
       <Text style={styles.noteDeleteText}>Delete</Text>
      </TouchableOpacity>
    </View>
   );
  }
 }
 const styles = StyleSheet.create({
  note:{
    position: 'relative',
    padding:20,
    paddingRight:200,
    borderBottomWidth:2,
    borderBottomColor:'#ededed',
  },
  noteText:{
    paddingLeft:2,
    borderLeftWidth:10,
    borderLeftColor:'#e91e63',
  },
  noteDelete:{
    position:'absolute',
    justifyContent:'center',
    alignItems:'center',
    backgroundColor:'#2980b9',
    padding:10,
    top:10,
    bottom:10,
    right:10,
  },
  noteDeleteText:{
   color:'black',
  },
 });


0 Komentar